Sunday, October 1, 2017

7 simplest tricks to improve your eyesight without laser surgery or glasses

Just about everyone's eyes go bad after the year pass. It become more difficult to see things that are closed to you or things that are further away. At a point in our lives we won't able to see anything clear anymore.

Many people ask me "Wearing glasses or contacts usually helps, but is there a way to repair our vision?". The answer is yes, here's how-


1. Taking your glasses off :

If you have to wear glass everyday, try to spend some time not wearing them. According to a study conducted by the ghana medical journal, 64% of nigerian undergraduate students believe that glasses are harmful to your eyes and according to a study conducted in brazil, even medical stuff believes that glasses can cause a serious damage to your vision.

2. Going outside :

You should spend more time in nature. Your eyes will be less exposed to light sources that may damage your vision, if you are hiking or hanging out in a park regularly.

3. Resting your eyes :

We recommend you to give your eye a breaks several time everyday. You can just close your eyes for a few minutes and clam your eye pressure, or go into a room with low lighting. Make sure play attention ans adjust the brightness at your computer and mobile screen if you have to spend most of your day looking at it. 

4. 20-20-20 rule :

Try to use the 20-20-20 rule, and take regular break from looking at your computer or mobile. This is very interesting eye exercise, and it's very simple to implement. For every 20 minutes of computer or mobile use, take a break and stare at something that is 20 feet away for at least 20 seconds.

5. Eye massage :

Several times a day, give you eyes a massage by gently applying pressure and rubbing the areas around your eye socket. It is very healthy for your eyes to use your index finger and thump to gently press on the area tight above the inner corner of your eyes. Stimulate the circulation in the eye area by massaging your temples and the area on the back of your skull directly behind your eye sockets.


6. Warm compression :

A commonly used method to treat eye problems is warm compression. Gently press a warm, damp cloth against your eyes for half an hour a day. This is a proven method and it is very helpful for moisten dry eyes.

7. Adding to your diet :

Entering a good amount of sweet potatoes and carrots every day, it could improve your eye health. These foods have high vitamin A, a nutrient which is essential to good vision.

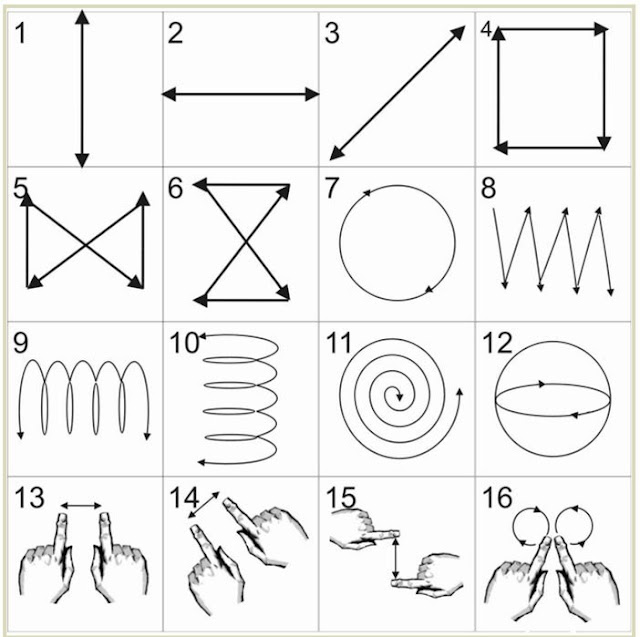
At last i give you an important tips to improve the strength of your vision. Implementing the following 16 simple exercise show below will improve the strength and the vision of your eyes. Just follow the line in the directions that the arrows are pointing. If you are doing this by the first time, try to focus on each symbol individually and just stare at them for a while so you can fully understand the meaning of them.

NOTE:  

If this is the first time doing this exercise, focus on one item and stare at it for a while. Your mind will absorb the meaning of the symbol. Your eyes may tear up and want to close a little bit. this means they are relaxed. 

THANK YOU.....

Sunday, September 10, 2017

Weight lose tips for teenagers.

Obesity is one of the most commonly faced problem today. It not only interferes with one's self-confidence, but also affected and harms the day-to-day activities. The way you look and feel plays an important role in one's life and your weight also plays an equal important role.

Most of teenagers today crave for size zero figures. So i searched in net that which product is best for looking slim and which products is best for reduce fat, then i found many results but the best of among are given below. You should try this and i am sure you will get better result. if you want to buy a latest product/gadget to become slim from amazon then click this product below. 

Teenagers across the globe today are fighting against various diseases for blindly following crash diets and unhealthy food habits. Losing weight for teenagers is very crucial who suffer from obesity. But this must be done in right manner. If you too happen to be a teenager and want to shed a few kilos, here is an article to help to achieve your target with a little more caution. 


Ways on how to lose weight for teenagers

Little change in your life style can make you healthier. Let's have a look of the tips on losing weight fast for teenager girls as described below.

1. Play, play and play
2. Ditch that soda forever 
3. Practice yoga every day
4. Never skip breakfast
5. Bunk junk food
6. Sleep well

1. Play, play and play:

Yes, you read that right. Playing can actually help you lose weight the right way. But, playing here doesn't mean playing indoor game.
  •  Get out in the open and indulge in various sports.
  •  It helps you stay fit and at the same time it makes you learn team building skills. It also improves focus and concentration.
  •  I recommend you play tennis, badminton and football. If you don't enjoy them then try your hand at cycling or even running You can buy this paling kit from amazon.And to help you i give some kit from amazon to buy those click them below.

2. Ditch that soda forever:

  • Sodas come loaded with empty calories.
  • They only add on more and more weight over a period of time
  • Sodas effect the look of your skin.
  • You must also skip other beverages in the form of caffeine and other packaged food as well.

3. Practice yoga everyday:

  • Yoga is the best medicine for weight lose.
  • There are some yoga pose to reduce fat,you also fallow them.
  • If you want to learn yoga then here is an article you must read. click here to learn yoga

4. Never skip breakfast:

  • Most of people think that if they skip their breakfast they will automatically reduce their fat but it's not true. Rather it give you many health problem.
  • Eat healthier foods like fruits and vegetables.
  • Don't eat junk food.

5. Bunk junk food:

  • If you eat junk food then it is the time to stop them.
  • Never eat oily food.
  • Prepare own food in your won home.
  • If you can't bunk junk food then forget that you will become fit and healthy.

6. Sleep well:

  • It's last but best tips that you must sleep well.
  • At night forget about any thing and just take a healthy sleep.
  • Reduce stress and overthinking. Our next article is about reduce stress so you should follow us.
At last i can say that never give up .I am sure if you do as i say then you will get better results with in a month. If you want to read our another article for weight lose then click here.

If you like our article and think it's very helpful then share with your friends..

THANK YOU......

Thursday, September 7, 2017

After reading this, you will never thrown away the onion skins.

We all are well aware of the fact that onions, despite their pungent odor,are very beneficial for our health. They are loaded with properties that protect you from illness. they are antibiotic, antimicrobial and antiseptic in nature. Their nutritional content and the benefit they provide are something that we all know about it, but did you know that the skin of the onion contains more antioxidants than the onion itself?

  Yes you read it right. We peel the onion skin and throw it away in the trash without realizing that these discarded scraps can make your meals go further. 

  Experts suggest that they contain quercetin (a flavanol), which can help control blood pressure and prevent clogging of the arteries. Onion skin is packed with fiber and phenolic compounds that help in preventing coronary disease.

So, the next time you peel an onion and through the skin away, just stop for a moment and recollect the health benefits of onion skin. A few of them are mentioned below.

How onion skin help?

1. They help in decreasing LDL cholesterol levels.
2. They help in maintaining the optimal levels of blood pressure.
3. They help to fighting against allergies.
4. They help in reducing inflammation. 
5. They help in treating depression.
6. They support muscle growth and their functioning.

 Now you might be thinking that since the skin of the onion is not edible, how can it be beneficial for your body?
The answer is very simple, there are many ways in which onion skin can do good to your health,body and skin. 

  Here are a few ways by which you can make the most of the out of those peels that you throw in your bin with out giving a second thought.

How to use onion skin?

1. Remove nutrients:

 The quickest and easiest ways to incorporate the nutrients present in the onion skin is to added a few of them stew in it until cooked properly. Later, you can take out the skin as most of the nutrients would have steeped in the liquid by the time the cooking is done.

2. Use as tea:

 Another way to use them is make tea out of tea ball. Let them steep in boiling water for some time.

3. Use for curing leg cramp:

 Onion skin are also considered to be a great remedy for curing leg cramps. Here is what you can do- oil the skin of onion in water fore 15-20 minutes. Now, drain the water using a clean cloth or a strainer and drink this infusion as tea right before going to bed. Repeat it for a week or so on. You will notice that those those horrid cramps are gone.

4. Use as dye for clothes:

 You can even use onion skins as a dye for woolen clothes.

5. Use as handle when chop onion:

 Onion skin can help you chop off onions and protect your fingers from getting cuts due to the knife. It will get the job done and keep your hands safe at the same time. All you have to do is instead of peeling of the thick skin, fold the thick parts of the skin and then using it as a handle, start chopping the onion

6. Use for hair growth:

  Onion skin also promotes hair growth. The reason behind it is that onions are rich in sulfur. This mineral promotes the formation of collagen and thus help in the maintenance of your hair. You can boil onion skins in water and use it as a rinse to promote hair growth and maintain healthy and shiny hair.

7. Use as hair dye:

 Onion skin can also be used as a hair dye. And the best part is it is much cheaper than the other hair care product. It works best on blonde hair. To use onion skins as a hair dye, boil 30-50 grams of onion peels in a glass of water for around half an hour. By now, the consistency of water will become thick. Filter the water and then apply this to your hair. Let it settle for some time and then rinse it off with shampoo. It will add a nice golden sheen to your hair.

8. use to rid skin disease:

 If you are suffering from any skin disease, rub onion skin over  your skin. This can help you get rid of the irritation. Rub it gently over the infected area and then wash it off with a gentle soap. 

9. Use to increase antioxidant:

 You can also use dried and ground onion skin in a small percentage as a replacement for wheat flour to increase the antioxidant content in bread.

NOTE: Make sure you use the skin of organic onions; other contain pesticides that can be harmful to your health. Also if you are pregnant or breastfeeding, do not try these methods as it can cause irritation to your skin. 

So that was an insight into the numerous benefits of onion peels. we hope you enjoyed reading the article. SHARE this and let your friends know about it. 


THANK YOU......

Thursday, August 31, 2017

Yoga for beginners with gif...(part-1).


Here we provide top five yoga pose for beginners and also for whom who already do yoga in their life. yoga is the best medicine for almost every disease. Everyone should practice yoga twice a week.
  Your yoga practice can do much more than lend muscle power and reduce stress. A short 20-minute session of yoga can help your brain work better and keep your mind focused. 

some yoga poses are given below,

 Yoga poses :

1. Tadasana (Mountain pose)

2. Vrikshasana (Tree pose)

3. Adho mukho svanasana (Downward facing dog pose)

4. Trikonasana (Triangle pose)

5. Kursiasana (Chair pose)


Each pose can be held for 3-5 long breaths, You can practice this twice a week and gradually make it a part of your daily routine.

1. Tadasana (mountain pose):


Stand with your heels slightly apart and hang your arm besides the torso. Gently lift and spread your toes and the ball of your feet, then lay them softly down on the floor. Balance your body weight on your feet. Lift your ankles and firm your tight muscles while rotating them inwards. As  you inhale, elongate your torso and when you exhale release your shoulder blades away from your head. Broaden your collarbone and elongate your neck. Your ears, shoulders, hips and ankles should all be in one line. You can check your alignment by standing against the wall initially. You can even rise your hands and stretch them. Breath easily.

2. Vrikshasana (Tree pose):

 
This pose give a sense of grounding. It improve your balance and strengthens  your legs and back. It replicates the steady stance of a tree. Place your right foot high up on your left thigh. The sole of the foot should be flat and placed firmly. Keep your left leg straight and find your balance. While inhaling, raise your arms over your head and bring up your palm together. Ensure that your spine is straight and take a few deep breath. Slowly exhale, bring your head down and release you right leg. back in the standing position repeat the same with the other leg.

3. Adho mukho svanasana (Downward facing dog pose):

  This pose stretches hamstring, chest and lengthens the spine, providing additional blood flow to the head. It is will leave you felling energized. sit on your heels, stretch your arms forward on the mat and lower your head. Form a table, like pushing your hands, strengthening your legs and slowly raising your hips. Press your heels down, let your head hand freely and tighten your waist.

4. Trikonasana (triangle pose):

  It stretches the legs and torso, mobilizes the hips and promotes deep breathing, leaving one with enlivening effects. Stand with your feet wide apart. Stretch your right foot out (90 degrees) while keeping the leg closer to the torso. Keep your feet pressed against the ground and balance your weight equally on the both feet. Inhale and as you exhale bend your right arm and make it touch the ground while your left arm goes up. Keep your waist straight. Ensure that your body is bent sideways and not forwards. Stretch as much as you can while take long, deep breaths. Repeat on the other side.

 5. Kursiasana (chair pose):

 
An intensely powerful pose, this one strengthens the muscles of the legs and arms. It builds your willpower and has an energizing effect on the body and mind. Stand straight with your feet slightly apart. Stretch your arms but do not bend your elbow. Inhale and bend your knees, pushing your pelvis down like you are sitting on chair. Keep your hands parallel to the ground and back straight. Take deep breaths. Bend gradually but make sure your knees do not go beyond your toes.
click here for yoga tools from amazon

We will give you another 5 yoga pose if this blog have minimum 50 share. 

Share with your friends and don't forget to like and comment on it. 

THANK YOU.......

Sunday, August 20, 2017

How to prevent pimples easily at home


Here we provide some natural way to cure or stop pimples and black spot. Pimple is the major problem for young generation, either boy or girl everyone has pimples at younger age. so read our blog carefully and obey some following steps.

SOME IMPORTANT TIPS :

1. Wash your face twice a day.
2. Avoid scrubbing your face with a rough washcloth, sponge or loofah.
3. Avoid touching your face or popping pimples.
4. Avoid overloading your skin with chemical products. 
5. Protect your skin from sun.
6. Eat plenty of fresh fruits and vegetables, and avoid fast food.
7. Drink plenty of water.

SOME NATURAL WAYS :

1. Using honey.
2. Use aloe vera.
3. Using an ice cube.
4. Use toothpaste.
5. Use tomato.
6. Apply fresh lemon juice. 

1. Using honey:


Honey is a natural amazing healing product, whose antibacterial, antiseptic and hydrating properties make it an excellent choice for fighting pimples. 
 You can apply the honey as a spot treatment or use it as a face mask, applying it all over the face on clean, slightly damp skin. as honey is a non-irritating, you can leave it on for as long as you like.

2. Using aloe vera:

 Take a big piece of aloe vera. Rub it on the pimpled place. Massage on the skin with the aloe vera on pimple zone. Leave it for half an hour. Wash it off with hot water.

3. Using an ice cube:


The ice reduces inflammation and redness, significantly improving the appearance of the pimple. Simply wrap an ice cub in some paper towel or a clean cloth and press gently against the pimple for a minute.

4. Using toothpaste:

   
Toothpaste contains ingredients such as baking soda and hydrogen peroxide which dry out pimples, helping them to go away faster. Make sure that you apply it directly onto the pimple, rather than on the surrounding skin.

5. Use tomato:


Tomatoes are packed with vitamins A and C which are prime pimple busting material. To use, simply cut up a fresh tomato and rub the juice from a slice directly on the target pimple. Do this twice a day and you should being to notice an improvement. 

6. Apply fresh lemon juice:


Lemon juice help to dry out pimples and reduce the redness of the pimples. A little fresh lemon juice can be applied directly to each pimple before bed and left on over time. Lemon juice should not be applied to your skin during the day, unless you plan on staying indoors. Lemon juice should only be applied directly on to the pimple and not on the surrounding skin.

Thank you.....


Sunday, August 13, 2017

5 NATURAL WAY TO PREVENT HAIR LOSE AT HOME


Hair loss is a common problem for us. There are a lot of ways to stop hair lose with any products. Here we give you some important tips  to reduce hair lose.


Some changes in your life style:

  • Take care of your hair.
  • Avoid chemical products.
  • Avoid wings or hairpieces.
  • Try to reduce your stress levels.
  • Taking vitamins such as vitamins A and B.

Treatments :

1. Egg oil (eyova) treatment
2. Onion juice treatment
3. Green tea treatment
4. Fenugreek (methi) seeds treatment
5. Aloevera juice and neem paste treatment


 1.Egg oil (eyova) treatment :

Massage egg oil into the scalp and leave on overnight.
-Shampoo off in the morning with a mild, preferably herbal shampoo. Use shampoo only once as repetition removes the natural lipids of hair making it dry and brittle.-Use egg oil 2-3 times a week for at least 12 weeks for visible results. Regularly continued use is important for proper nourishment of the cell membranes.
-Continue long term massage therapy of egg oil to prevent hair fall and graying.Discontinuing use may gradually bring back hair fall problems.
-Egg oil is mess free and stable. It is more convenient alternative to egg yolk masks and dose not smell like raw egg yolks or cook in the hair during a hot shower. 

 To buy egg oil from amazon then click here

2. Onion juice treatment :

Try rubbing your scalp with onion. Leave the juice on your scalp overnight and wash it out in the morning.

3. Green tea treatment :

Rub green tea into your hair. The tea contains anti-oxidants, which may prevent hair loss and help hair growth. Brew 2 bags o green tea in one cup of water. Let the tea cool slightly, and then apply it to your hair. Leave the tea on for 1 hour. Then rinse your hair thoroughly.

4. Fenugreek (methi) seeds treatment :

This will provide shine and add strength to hair with regular use. soak and grind one cup of fenugreek (methi) with sufficient water to make paste. Apply to the scalp and massage it lightly. leave it for half an hour. Rinse  out with cold water.

5. Aloevera juice and neem paste treatment :

This treatment  is good to control hair fall. Mix aloevera juice with neem powder and add 2-3 drops of coconut oil. Apply it on your scalp and leave it for half an hour. Wash it off with shampoo. Follow this treatment once in a week for the desired results. 

to buy aloevera and neem pest from amazon then click here

  THANK YOU......

Saturday, August 12, 2017

HOW TO INCREASE YOUR ARM MUSCLES EASILY AT HOME......


Here is some very simple and effective work out to increase your arm's muscle like biceps, triceps and shoulder. Aim to perform this workout between 4-6 day per week.It should taken only 15 minutes to complete .


The routine (repeat 3 times)

1. Push up  (15 reps)
2. Plank (30 sec)
3. Wide-hand push up (12 reps)  
4. Right-side plank (25 sec)
5. Shoulder push up (12 reps)
6. Tabletop dip (15 reps)
7. Left hand plank (25 sec)
8. Burpee (10 reps)


1. push up : 

Keeping a prone position with the hands palms down under the shoulders, the balls of the feet on the ground, and the back straight, pushes the body up and lets it down by an alternate straightening and bending of the arms.

2. Plank :

Lie on the floor with elbows directly beneath your shoulder and legs fully extended. Raise your torso into the air until it makes a straight line from your shoulder to your ankles. Tighten your stomach, squeeze your butt.

3. Wide-hand push up :

Get in the standard push up position with hand and feet wider than shoulder width apart. Elbows should be completely locked out and body in straight line from head to feet. Brace core and slowly lower chest to the ground, pushing for two second just above the ground. Engage your pecs and triceps to push back up to starting position.

4. Right side plank :

Lie on your side. position yourself on your bottom elbow and the side of your foot.lift your hips in the air, forming a straight line between your ankles, hips, and shoulders. Brace your abs and squeeze your glutes.

5. Shoulder push up :

Start in a standard push up position with your hand slightly wider than shoulder width apart and elbows completely locked out. shoot your hips towards the ceiling and plant your toes into the ground so your body looks like an upside down 'v'. Slowly lower the top of your head toward the ground. Once your head is about to make contact with the ground,pause and then press back up to the starting position.

6.Tabletop dip :

Sit on the edge of the bench with your hand below your shoulder and knees bent to 90 degree. Palms should be placed firmly on t he edge of the side of the bench. Be sure to grip tightly. Brace your core, squeeze the glutes, and step forward so your arms are 
fully extended and now support your body weight. Bend your elbows, lowering your body n front of the  bench until you reach  the 90 degree point.Hold, keeping elbows tucked to your torso, then use the power of your triceps to return back the starting position.

7. Left hand plank :

Lie on your side. Position yourself on your bottom elbow and the side of your foot. Lift your hips in the air, forming a straight line between your ankles,hips and shoulders. Brace your abs and squeeze your glutes.

8.Burpee :

Stand tall with your feet shoulder width apart and your hands at your sides. Quickly lower your hips and place your hands in front of your feet then kick your feet back into a push up position. Complete a push up. jump your feet back under your hips, extend your body toward the ceiling as you jump up and touch your hands behind your head.  


THANK YOU......

Thursday, August 10, 2017

TEN MINUTE HOME WORKOUT FOR SIX- PACK ABS


This is a quickest way to get six-pack. Aim to perform this workout between 2-4 times per week. It should take only 10 minutes to complete . 

The routine(repeat 3 times)

1.the overhead crunch 12 reps

2.the frozen v sit 12 reps

3.revers crunch 12 reps 

4.janda sit-up 12 reps 

5.extended plank 45 sec


1.the overhead crunch :

Lie on your back with your knees bent and your arms straightened behind you. Then keeping your arms straight above your head, perform a traditional crunch. The movement should be slow and controlled.

2.the frozen v sit : 


Lie down on your back with your arms and legs outstretched and your hands and feet lifted just above the floor. Begin the exercise by simultaneously raising your torso and legs up to touch your feet. Hold for the required time.


3.The reverse crunch : 

Lie on your back and place your hands behind your head, then bring your knees in towards your chest until they are bent to 90 degrees, with feet together . Contract your abs to curl your hips off the floor, reaching your legs up towards the ceiling, then lower your legs back down to their original position without letting your feet touch the floor.

4.Janda sit-up : 

Lie on your back with your knees bent and hands placed behind your head. then try digging your heels into the floor, contracting your hamstrings, whilst performing an ordinary crunch.

5.The extended plank : 

Get into a press up position, placing your hands around 10 inches in front of your shoulders, with the toes of your shoes placed against the floor. Hold this position with your back straight and try to continue to breath as normal.

 THANK YOU.....


After reading this, you will never thrown away the onion skins.

We all are well aware of the fact that onions, despite their pungent odor,are very beneficial for our health. They are loaded with prope...